In today’s article, I will show you how to host your website on DigitalOcean’s clouding host ($100 free credit) using Docker containers and Nginx reverse proxy.
Configure Docker for ASP.NET Core
What is Docker?
The containers permit to isolate the application resources, allowing at the same time the sharing of the server resources. There are similar to virtual machines but instead of using an operating system and define resources for each instance, the containers will share the same operating system as the parent server and will use the same resources.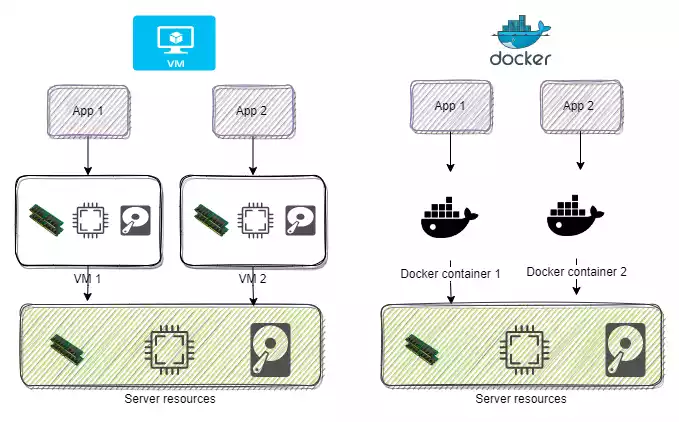
Dockerfile for ASP.NET Core
The first step is to install Docker on your computer. To configure Docker for your ASP.NET application, you will need a Dockerfile. This file contains the build instructions. For instance, you set up the SDK version that you use to build the project, install operating system libraries, expose ports, etc.
The easiest method to configure Docker in Visual Studio is to right-click on your project and select the Docker support option.
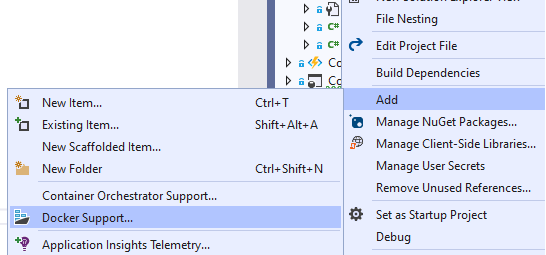 A new file named Dockerfile will automatically be created. Visual Studio will identify your project .NET version and will specify the SDK that you will need, will expose the ports 80 and 443 for SSL.
FROM mcr.microsoft.com/dotnet/aspnet:5.0 AS base # download the run time
WORKDIR /app
EXPOSE 80 # expose the web port
EXPOSE 443 # expose the web ssl port

FROM mcr.microsoft.com/dotnet/sdk:5.0 AS build # download sdk build
WORKDIR /src
COPY ["RandomProject/RandomProject.csproj", "RandomProject/"]
RUN dotnet restore "RandomProject/RandomProject.csproj"
COPY . .
WORKDIR "/src/RandomProject"
RUN dotnet build "RandomProject.csproj" -c Release -o /app/build

FROM build AS publish
RUN dotnet publish "RandomProject.csproj" -c Release -o /app/publish # publish the app

FROM base AS final
WORKDIR /app
COPY --from=publish /app/publish . # copy the app in the framework folder that was downloaded in the first step
ENTRYPOINT ["dotnet", "RandomProject.dll"]
Using this docker file you will build the image, which will be run by the container. Run the following command in cmd.
docker build -t randomproject .
The dot represents the current folder where is located the Dockerfile.
The basic steps to work with Docker
For a better understanding of what is the basic process to work with Docker, here are the steps:
- Create a Dockerfile for your project
- Based on the Dockerfile, build an image with the command
docker build -t imagename . - Run a container from the image using a docker-compose file or by running the following command.
docker run -it --rm -p 80:80 --name containerName imageName
- For using the image on a remote server, you should publish it in a Docker container registry.
Nginx – Reverse proxy for ASP.NET
Similar to Kestrel, Nginx is a Web Server that has more features and can work as a reverse proxy for the hosted websites.
Using a reverse proxy as Nginx you can host multiple websites on the same server. Also, using Docker containers the applications will be isolated and can be moved easily on other servers.
You must create a configuration file and set up which application should be selected for a particular request. The configuration file name will be nginx.conf.
worker_processes 1;

events { worker_connections 1024; }

http {

    sendfile on;

    upstream randomproject {
        server randomproject:80; # the name of the docker container
    }


server {
        listen 80;
        server_name randomproject.com; # the domain

        location / {
            proxy_pass         http://randomproject;
            proxy_redirect     off;
            proxy_set_header   Host $host;
            proxy_set_header   X-Real-IP $remote_addr;
            proxy_set_header   X-Forwarded-For $proxy_add_x_forwarded_for;
            proxy_set_header   X-Forwarded-Host $server_name;
        }
    }
}
After that you created the configuration, you will need to create the docker file from which you will run the container.
FROM nginx:alpine # use the nginx image that is found on docker hub

COPY nginx.conf /etc/nginx/nginx.conf # copy the configuration file from the previous step
Docker Compose for multiple containers
You can have multiple containers with different websites on the same server. Similarly, you can put your database server into a container, sharing that connection with the others containers.
Using a docker-compose file you can start all the containers in the same or in a particular order. In our case, we will need first to start the container that has the Nginx web server. Create a file with the following name: docker-compose.yml.
version: '3.7'

services:
    reverseproxy:
        image: reverseproxy
        container_name: reverseproxy
        ports:
            - 80:80
            - 443:443
        restart: always

    postgres:
        image: postgres:12
        container_name: postgres
        environment:
            - POSTGRES_USER=admin
            - POSTGRES_PASSWORD=Abc123456#
        ports:
            - 5432:5432
        volumes:
            - /var/lib/docker/volumes/postgres/_data:/var/lib/postgresql/data

    randomproject:
        depends_on:
            - reverseproxy
        image: randomproject
        container_name: randomproject
        restart: always
        volumes:
          - /srv/randomproject:/app/App_Data
The above script specifies that I want 3 containers: one for the Nginx server, the second for the Postgres database, and the last one for my application (randomproject).
To run the container from the docker-compose file, run the command: docker-compose up -d. This command will run the containers in the detached way on your machine.
Publish the Docker image in a registry
In order to use the image of your application on a server, you should put your image in a register for simplicity. Then you will be allowed to download the image from any location.
A container registry works similarly to how version control works for code. You publish your image then is available anywhere.
In Visual Studio the process to publish the image to a container registry is pretty explanatory. Right-click on your project and then Publish. Then create a new profile and select Docker Container Registry.
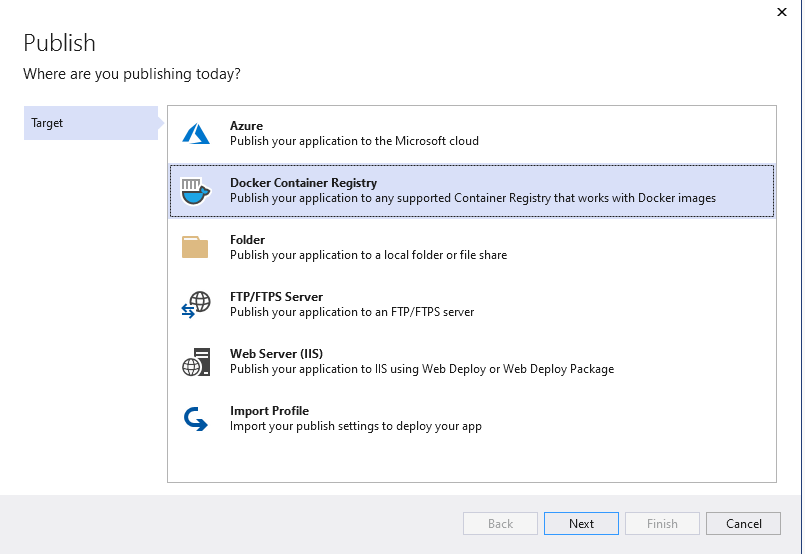
Then you should choose what container registry do you want to use. I personally use Docker Hub. It offers one private repository and unlimited public repos.
Host an ASP.NET Website on DigitalOcean
DigitalOcean is one of the cheapest hostings in the cloud. It offers hosting packages starting from $5 for a month. Usually, it is faster than traditional hosting.
The first step to host an app on DigitalOcean is to create a Droplet, which is the name that defines your cloud server. After that, follow this tutorial to enable Docker on your Ubuntu server if it isn’t enabled.
The second step is to move the docker-compose file. If you want you can also move your configurations and the application file on the server in order to create the docker image. My recommendation is for the application to use a docker registry and then use the command:docker pull hubUser/nameOfTheImage:latest. If you use a docker-compose file this step is not mandatory.
The Nginx image can be easily be created directly on the server. Move the configuration file and the Dockerfile that we have created before. Then build the image: docker build -t reverseproxy .. Make sure the image file and the configuration file are in the same folder.
In the end, you should run the docker-compose file docker-compose up -d.
1 thought on “Host your ASP.NET Core on Cloud using Nginx and Docker”