ASP.NET Identity is a .NET library that allows you to easily implement a user management system for your application. It offers out of the box the following: registration, login, two-factor authentication, external login providers, email confirmation, security roles, and claims.
If you create an application from start, you have the option to choose to add the Identity.
What if you forgot to check that option and you want to add Identity to an existing project?
Configure Identity in .NET Core 6
Install the NuGet Packages:
Install-Package Microsoft.AspNetCore.Identity
Install-Package Microsoft.AspNetCore.Identity.EntityFrameworkCore
Install-Package Microsoft.EntityFrameworkCore.SqlServer
Install-Package Microsoft.EntityFrameworkCore.Tools
Install-Package Microsoft.EntityFrameworkCore.Design

-- If you want to use the default UI offered by ASP, install the following library
Install-Package Microsoft.AspNetCore.Identity.UI

-- For scaffold
Install-Package Microsoft.VisualStudio.Web.CodeGeneration.Design
For this tutorial, I assume that you use Entity Framework with the code first migrations approach. I have used the SQL Server library, but you can find the corresponding library for other types. Also, I will scaffold the default views offered by ASP, but you can use your custom views or you can modify the scaffolded views.
Configure the connection string in appsettings file.
{
  "Logging": {
    "LogLevel": {
      "Default": "Information",
      "Microsoft.AspNetCore": "Warning"
    }
  },
  "ConnectionStrings": {
    "DefaultConnection": "Data Source=localhost\\SQLEXPRESS;Initial Catalog=ProgrammingCsharp;Integrated Security=True" // Modify with your connection string
  },
  "AllowedHosts": "*"
}
If you don’t have a database, install the SQL Express. Follow this tutorial if you don’t know how to do it.
Create the DbContext class
The Identity library comes with IdentityDbContext class which already extends the DbContext class. So, we have to extend this class. Create the following class only if you don’t have a DbContext already:
public class AppDbContext : IdentityDbContext<IdentityUser, IdentityRole, string>
{
    public AppDbContext(DbContextOptions<AppDbContext> options): base(options)
    {
    }
}
If you already have a DbContext, make sure that you inherit the IdentityDbContext class.
Register Database Context service in the Startup
builder.Services.AddDbContext<AppDbContext>(options =>
        options.UseSqlServer(
            builder.Configuration.GetConnectionString("DefaultConnection")));
If you don’t use SQL Server, change the UseSqlServer with the corresponding method.
Register the Identity service
builder.Services.AddDefaultIdentity<IdentityUser>
    (options =>
{
    options.SignIn.RequireConfirmedAccount = true;
    options.Password.RequireDigit = false;
    options.Password.RequiredLength = 6;
    options.Password.RequireNonAlphanumeric = false;
    options.Password.RequireUppercase = false;
    options.Password.RequireLowercase = false;
})
.AddEntityFrameworkStores<AppDbContext>();
For this demo, I don’t want to confirm the account with a confirmation email. Also, the password can be simple.
Configure the Authentification and Authorization middleware:
var app = builder.Build();

if (!app.Environment.IsDevelopment())
{
    app.UseExceptionHandler("/Error");
    app.UseHsts();
}

app.UseHttpsRedirection();
app.UseStaticFiles();

app.UseRouting();
app.UseAuthentication();
app.UseAuthorization();

app.MapRazorPages();
app.Run();
Make sure that you add the Authentification middleware after the Routing middleware.
Add the first migration
Open the Package Manager Console and enter:
Add-Migration InitialMigration -verbose
The verbose option is not mandatory, but you can see step-by-step what was executed. Also, you can see detailed errors. Check the generated class.
Update the database
Update-Database -verbose
After you execute the above command, the tables to store users/roles were created. You can check them in the database.
Add Scaffolded Item
Right-click on the project and select Add New Scaffold Item.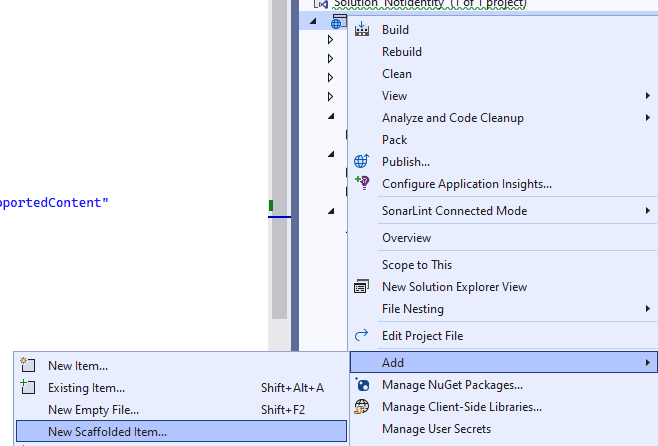
Solving Identity Scaffold Errors
Probably, you have received the following error: Scaffolding failed. The path is empty. (Parameter ‘path’)
To solve this error, remove Microsoft.AspNetCore.Identity package from the csproj file:
Uninstall-Package Microsoft.AspNetCore.Identity
Try again to add the Scaffold item (step 9). There is a big chance to get another error, telling you the following message: Missing IdentityHostingStartup.cshtml.
The solution came from this GitHub issue.
-
- Copy this Razor view from GitHub.
- Add this file to the location where is missing:
https://github.com/dotnet/Scaffolding/blob/main/src/Scaffolding/VS.Web.CG.Mvc/Templates/Identity/Bootstrap4/IdentityHostingStartup.cshtml
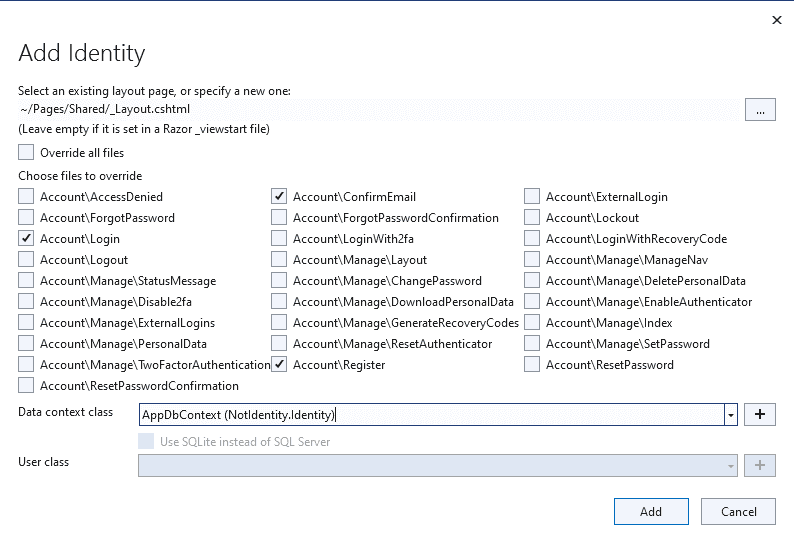
Now the scaffold should work. The files were created in the Area folder and a LoginPartial was created in the Pages/Controllers folder.
Modify the layout and include the Login partial
In the _Layout.cshtml file, make sure that you include the login partial. This partial include the labels.
<nav class="navbar navbar-expand-sm navbar-toggleable-sm navbar-light bg-white border-bottom box-shadow mb-3">
    <div class="container">
        <a class="navbar-brand" asp-area="" asp-page="/Index">NotIdentity</a>
        <button class="navbar-toggler" type="button" data-bs-toggle="collapse" data-bs-target=".navbar-collapse" aria-controls="navbarSupportedContent"
                aria-expanded="false" aria-label="Toggle navigation">
            <span class="navbar-toggler-icon"></span>
        </button>
        <div class="navbar-collapse collapse d-sm-inline-flex justify-content-between">
            <ul class="navbar-nav flex-grow-1">
                <li class="nav-item">
                    <a class="nav-link text-dark" asp-area="" asp-page="/Index">Home</a>
                </li>
                <li class="nav-item">
                    <a class="nav-link text-dark" asp-area="" asp-page="/Privacy">Privacy</a>
                </li>
            </ul>
            <partial name="_LoginPartial" />
        </div>
    </div>
</nav>
In the end, you have implemented the login system. When you run the application you must see the login button. You can scaffold more views if you don’t want to use the default ones.
hi, first congratulations for your post, I followed carefully yours but I can not call but in the end I can not call the pages I attach the code :
Register
Login
I see Register and Login link but when I click nothing happens ,have you some suggestion? ,
Thankyou in advance
Regards
Marco
It seems that you didn’t attach a href attribute to you anchors.
Take a look at this example:
Login
Best tutorial online I found for this online…just followed step by step and was good!
good one but how do i implement identity for asp.net web api to be consumed by a different frontend app … by which i mean i have a react app running on port 3000 and i have asp.net web api (not using razor) please help